Wednesday, July 7, 2010

Cooking with Homegrown Vegetables

I wish! This is my first attempt at a vegetable and fruit garden. I must admit that our garden and any other plants growing in our yard are "late-bloomers." It seems like everyone's plants are growing like crazy. I am hoping this is due to our plants being newer and needing to be established. Furthermore, the zoo in our yard (deer, squirrels, rabbits, maybe even a groundhog, and the usual pests/insects you find outside) doesn't help to promote growth.

My dream is a huge, lush, ever-bearing garden where I can pick fruits and vegetables to enjoy every day.

My prayer is at least a few full-grown pieces to show for all the work I put into the garden.

My reality is 1" tall cucumber and pepper sprouts, flowers falling off plants before they produce any fruits, blight on tomatoes, and probably enough bugs to wipe out everything in the garden in 1 day.

P.S. The marigolds are for preventing small creatures from getting into the garden. I hope they're doing something for the garden.

JUNE 26, 2010:


JULY 17, 2010:
As you can see, the honeydew (center of the garden) is starting to take over.  The zucchini (top right of center), squash (top right), and spaghetti squash (bottom right of center) are steadily coming along.  Dill (bottom right) and peppers (bottom left) are very slowly growing.  The cucumbers (top left) have bit the dust.  One cucumber plant completely dried up and I pulled it out.  In it's place, I move over one of the smaller honeydrew plants.

Friday, June 25, 2010

Easy Beer Bread

Do you have beer in your fridge that you or your significant other refuses to drink? Maybe you bought a beer to try, but did not like the taste. Maybe you have beer left over from a party or a host/ess gift. The beer sits in the fridge for months, or even years. I have a solution for you! A very easy and delicious recipe. I turn to this recipe for two reasons: I need bread and can't/don't want to drive to the store, or I have old beer. I always have all the ingredients on hand, so I don't have to buy any special ingredients.

Unless the beer is very flavored (e.g. Cherry Wheat), you will hardly taste it in the final product. I've had Blueberry Beer in my fridge for two years ago and have made amazing Blueberry Beer Bread with it.

Use old, rotten bananas for banana bread; use old, skunky beer for Beer Bread. I have made the following recipe 5+ times with great results. Please note that beer bread is a dense bread, but so delicious!

Ingredients:

3 cups self-rising flour (or use unbleached flour with ratio of 1 tbsp of baking powder to 3 cups of flour)
1/2 cup sugar (can cut down to 1/3 sugar)
12 ounces beer
2 tablespoons melted butter
Optional: herbs, spices, fruits, nuts, honey, poppyseeds, chocolate, cheese, etc. (but not all at once)

Directions:

1. Preheat oven to 375 degrees F.

2. Butter loaf pan and set aside.

3. In a large bowl, combine the flour, sugar, and beer and mix well. Add any other extra ingredients (I've tried blueberries with Blueberry beer, or rosemary for a savory taste). The mixture should be sticky.

4. Pour batter into loaf pan and bake for 55 minutes. During the last 3 minutes of baking, remove from oven, brush the top of the loaf with butter and return to oven. An alternative is to pour the butter on top of the batter before placing in the oven, and cut out one step. (I don't usually butter the top, it will be crispy without the butter)

5. Enjoy bread with butter or your favorite spread. Pair it with a salad, soup, or chili.


Recipe courtesy Catherine Bienik (Food Network)
http://www.foodnetwork.com/recipes/calling-all-cooks/beer-bread-recipe/index.html

*My tips and suggestions are always in blue.

Sunday, January 31, 2010

Carrot Apple Salad

Carrot Apple Salad is a delicous side dish, snack, or dessert. I have been eating this salad since I was a little girl. You cannot get any healthier than carrots and apples. For those of you with kids, this is a great way to get them to eat something a little different than the typical raw veggies and dip. The shredded carrots and apples pair together so well that no one will know they are eating such a healthy dish. I even substitute this salad for cole slaw.

The clean taste of this salad is both unexpected and delicious. Don't be fooled by the simplicity, this salad is full of Vitamin A and Vitamin C and has no fat or cholesterol.

Recipe:
2 cups firmly packed shredded carrots
2 cups firmly packed shredded apple (firm, tart apples, like Granny Smith work best)
1 tbsp sugar (can substitute honey)

In a large bowl, toss together the apples, carrots, and sugar.

Additions: nuts like walnuts or peacans, raisins, or herbs like cilantro, parsley.
Note: If you are worried about the shredded apple turning brown, you can add a little lemon juice to the mix.


Monday, December 28, 2009

A New Level of Cooking with my French Oven

I have been wanting a Le Creuset French Oven for several years now. I don't know when or where the obsession with Le Creuset cookware started, but it's quite an expensive obsession to have. The investment is quite worth it though, because of the versatility of the cookware. Two thumbs up for anything you can use on the stove top and in the oven!

Santa (aka My Wonderful Husband) answered my wishes this year. I am excited to welcome a new member of my kitchen:

Le Creuset Round French Oven, in Cobalt

I am excited to try all kinds of soups, stews, roasts, and sauces in this ideal piece of cookware for simmering, marinating, poaching, braising and browning.

Monday, November 16, 2009

Satisfy Your Italian Craving

I am sharing another one of my favorite recipes with you. Ever since I saw Giada make this dish on her show, Everyday Italian, I had to try it. I did try it and my husband and I both fell in love with this dish. I have been making it for years. Don't let the ingredients scare you away. They all come together so nicely.

Shells with Crispy Pancetta and Spinach

Prep: 15 minutes
Cook: 25 minutes
Serves: 4-6

Ingredients:

Shells:
1 (12-ounce) package jumbo shells pasta
2 tablespoons olive oil
1/2 pound thick-cut pancetta, cut into 3/4-inch cubes - can sub bacon or ham
2 pounds frozen spinach, thawed, drained - I used 1 package
1 (15-ounce) container whole milk ricotta - can sub low-fat ricotta
1 cup grated asiago cheese - can use an Italian cheese blend
1/2 teaspoon freshly ground black pepper
1/4 teaspoon freshly grated nutmeg - can omit

Sauce:
(Instead of this sauce, I use regular pasta sauce)
1 tablespoon butter
1 garlic clove, minced
1 cup cream
2 cups grated asiago cheese, plus 1/4 cup
1/4 cup chopped fresh parsley
1/4 teaspoon freshly ground black pepper

Directions:

Preheat the oven to 375 degrees F.

For the Shells:
1. Bring a large pot of salted water to a boil over high heat. Add the pasta and cook until tender but still firm to the bite, stirring occasionally, about 8 to 10 minutes. Drain pasta.
2. Warm the olive oil in a large, heavy skillet over medium heat. Add the pancetta and cook until lightly golden, about 5-10 minutes (similar to cooking bacon). Remove the pancetta from the pan with a slotted spoon and transfer to a large bowl.
3. Add the spinach, ricotta cheese, asiago cheese, pepper, and nutmeg. Stir to combine.
4. Stuff the shells with about 1-2 tablespoons of the spinach mixture each and place the stuffed shells in a large, buttered baking dish.

For the Sauce:
(Instead of this sauce, I use about 2 cups of regular pasta sauce. The point of having a sauce on top is to prevent the shells from drying out)
1. Melt the butter in a medium saucepan.
2. Add the garlic and cook for 1 minute.
3. Add the cream and bring to a simmer.
4 .Turn the heat to very low and add the 2 cups asiago cheese, parsley, and pepper. Stir until the cheese is dissolved.

Completion:
1. Pour the sauce over the shells.
2. Top with the remaining 1/4 cup asiago cheese.
3. Bake until golden on top, about 25 minutes. Remove from the oven and serve immediately.

Shells with the buttery, cheesy sauce
Picture courtesy of Food Network


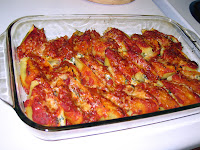
Shells with pasta sauce
Picture courtesy of me

Recipe courtesy of Giada DeLaurentiis
http://www.foodnetwork.com/recipes/giada-de-laurentiis/shells-with-crispy-pancetta-and-spinach-recipe/index.html

Saturday, June 27, 2009

Slow Cooker Pork Tacos

These delicious, succulent tacos are on the menu for Sunday night. I have a day at home to catch up on chores and some work, so bringing out the slow cooker is a perfect and easy solution to a satisfying dinner.

Ingredients:
3 whole ancho chiles - used 3 poblano peppers, roughly chopped
3 whole pasilla chiles - can leave out
4 cloves garlic
2 to 3 chipotles in adobo sauce
1/2 medium white onion, roughly chopped
3 tablespoons extra-virgin olive oil
2 tablespoons honey
1 tablespoon cider vinegar
Kosher salt
2 teaspoons dried oregano, preferably Mexican
3 3/4 cups low-sodium chicken broth - can use water if broth is not available
4 pounds boneless pork shoulder (untrimmed), cut into chunks - or any other type of pork or beef (used boston butt)
Freshly ground pepper
2 bay leaves
1 cinnamon stick - the whole stick was too much for me, I recommend 1 tsp or tbsp
Corn tortillas, warmed, for serving
Assorted taco toppings, for garnish

Directions:
1. Put the ancho and pasilla chiles and the garlic in a bowl. Microwave on high until soft and pliable, 2 to 3 minutes. Stem and seed chiles. Transfer chiles and garlic to a blender (or food processor). Add the chipotles, onion, 2 tablespoons olive oil, honey, vinegar, 1 tablespoon salt and the oregano to the blender; puree until smooth.


2. Heat the remaining 1 tablespoon oil in a large skillet over high heat; add the chile sauce and fry, stirring, until thick and fragrant, about 8 minutes. Pour in the broth and reduce until slightly thickened.
3. Season the pork all over with salt and pepper and transfer to a large slow cooker. Add the bay leaves and cinnamon stick, then pour in the sauce. Cover and cook on high until the meat is tender, about 5 hours. (Or cook the meat in a large Dutch oven, covered, for 1 hour 45 minutes at 350 degrees; uncover and cook 30 more minutes.)

4. Discard the bay leaves and cinnamon stick. Shred the pork with 2 forks; season with salt and pepper. (If you prefer a thicker sauce like pictured below, leave the crock pot on Low, open the lid and let the liquid cook off for about 5-10 minutes).

5. Serve the shredded pork in the tortillas, along with toppings.


Recipe courtesy of Food Network Magazine
http://www.foodnetwork.com/recipes/slow-cooker-pork-tacos-recipe/index.html

Friday, June 19, 2009

Red Curry Chicken - Thai our Way!

My husband and I love Thai food! One Friday night, he wanted to try making Thai at home. From that moment, we have been trying every single recipe, no matter how intimidating. Red Curry Chicken has become one of our favorite recipes. Don't be intimated by the ingredients or curry. Although there are variations to this recipe, we found this particulate one to be very easy. You can control the amount of spice and heat. We have experimented with different curry pastes and have found to love all of them.

Red Curry Chicken with Basil

Total: 25 minutes
Prep: 10 minutes
Serves: 4

Ingredients:
1 tablespoon vegetable oil
1 1/2 tablespoons Thai red curry paste
1 (14 ounce) can coconut milk,
shaken
1 1/2 lbs boneless skinless chicken breasts, sliced into bite size pieces (if you want to make it meat-less, use firm tofu, cut into small slices and add your desired veggies)
2 teaspoons sugar
2 teaspoons fish sauce or soy sauce –
can leave out or substitute oyster sauce
1 red bell pepper, cored and sliced – can add extra bell pepper, onion, baby corn, bean sprouts, bamboo shoots, etc.
10 large basil leaves, chopped – can leave out
Rice

Equipment: A large frying pan with tall sides and lid works much better than a wok!

Directions:
1. Heat the oil in the frying pan over medium heat.
2. Add the curry base and simmer for 2 minutes, so that it is dissolved and foaming. Stir frequently so the curry doesn’t burn.
3. Stir in the can of the coconut milk. Cook over medium heat for 4 minutes, stirring occasionally until the coconut milk begins to bubble and thickens
4. Add the sliced chicken. Simmer for 2 minutes and then add the vegetables.
5. Stir in sugar and fish sauce. Simmer until the chicken is cooked, about 3 minutes more.
(I usually turn the heat down to Low-Med, close the lid, and simmer for 5-10 minutes so the vegetables soften a little. If you like a thicker sauce, keep the lid off to let the sauce reduce).
6. Add the chopped basil. Season to taste with more sugar or seasoning sauce as desired.
7. Serve chicken, vegetables, and sauce over rice.


Tip: Experiment with the amount of curry and the different types of curry. Our favorites are Panang Curry (sweeter and milder) and Massaman Curry (aromatic and loaded with dry spices). We are still exploring other curries.

Recipe courtesy of A Taste of Thai